
Eplan Platform
General information
This template helps you to create a host pool for Azure Virtual Desktops (AVD) in your Azure subscription. This enables a roll-out of the Eplan Platform software as well as the optionally available Add-on modules from the current Eplan Platform.
- An AVD host pool is created according to your settings
- The specified number of machines is created
- The application group is created with the host pool
- The machines are added to the specified domain
- The Eplan Platform version is installed locally on the machine.
After the creation you still need:
- Perform a user assignment in the application group
- Assigning the Application Group to a Workspace
If you want to assign new machines to an existing installation, you are also welcome to contact Eplan Consulting for assistance. After rolling out these Azure deployments, the responsibility and maintenance is in your hands.
Steps
To setup the Eplan Platform with Azure virtual desktop via Azure Marketplace, make sure you are logged in with an account which has sufficient administrative rights in the Azure subscription.
- Select the subscription, the resource group and the location in which the virtual machine shall be created.
- Set the VM location and a Host pool name. By default it is HP1 and can be changed.
- Select the AVD meta data location. This can be different to the VM location.
- The Host pool type can be set to Pooled (shared), if multiple users shall be able to log into the same machine. In this case, you can also set the limit of maximum sessions.
- The load balancing algorithm Breadth-first will distribute new users across all available sessions in the pool.
- Depth-first will distribute new users to the available host with the highest number of connections, which has not yet reached its maximum number of sessions.
- The Host pool type Personal (dedicated) will dedicate one host for each user.
- If the Assignment type is set to Automatic, the users will automatically be assigned to an available host.
- If the Assignment type is set to Direct, the Administrator needs to manually select a host to assign to a user.

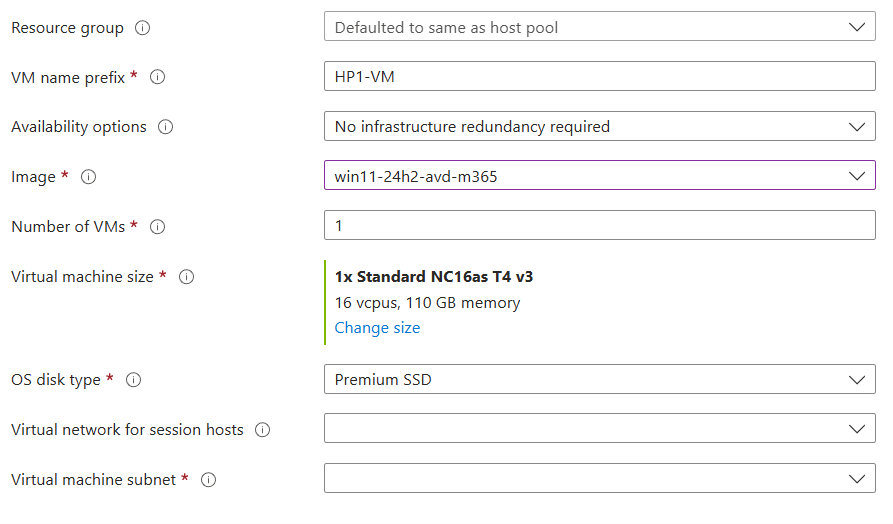
- In the next tab, you can select a Resource group. By default, this will be the same Resource group, as the host pool.
- Next, you can set the VM name prefix. -1, -2, -3,…etc. will automatically be added at the end of the VM name.
- You can select your availability options and the Windows image. Please always refer to your software approvals.
- Below this, you enter the amount of VM that shall be created.
- The size of the virtual machine is set to NC16as T4 v3, this size is suitable for 3D layout spaces. If required, it can be changed to DS3_v2.
- The OS disk type is set to a Premium SSD and cannot be changed.
- Underneath you can select your VNET and subnet or create a new one.
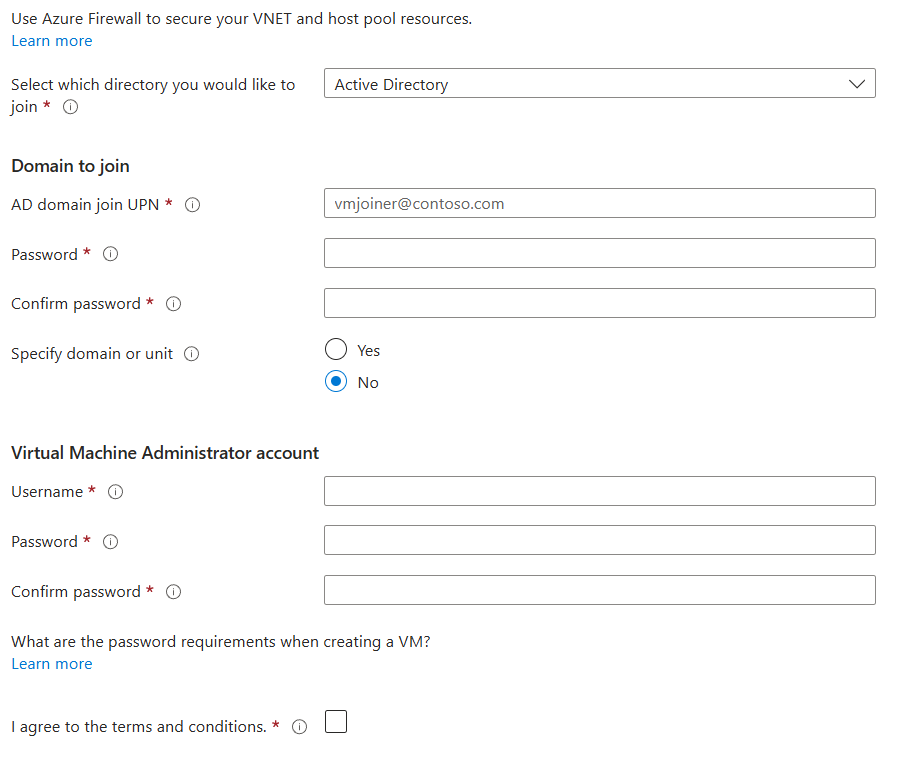
- In the next section, enter the Active Directory (AD) and the local user accounts.
- The AD user must have the permission to join the VM to the domain.
- Navigate to Azure Virtual Desktop - Host pools - <Host pool name> - Application groups - <Host pool name>-DAG - Assignments (manage) - Add - select the user (group) and click Select.
- Navigate to Azure Virtual Desktop – Workspaces - <Workspace name> - Application groups – Add – click the “+” sign, next to <Host pool name>-DAG and click Select.
- Navigate to Azure Virtual Desktop – Workspaces - <Workspace name> - Application groups – <Host pool name>-DAG – Applications - Session Desktop.
- To connect to the created VMs, you need to download Microsoft Remote Desktop (not to be confused with Remote Desktop Connection).
- Open Microsoft Remote Desktop, click the […] button and select subscribe. Login with the Microsoft account, which was added to the Application group.
The described steps rely on the Eplan servers and services available in the Azure Marketplace. These might need to be configured before they are ready to use. Please refer to the other deployment guides available.
When you first start Eplan Electric P8, you will be asked to enter your license.
- Select Connect to Eplan License Manager and click OK.
- Now enter the address of the Server, where the Eplan License Manager is installed, and click OK.
Note:
Single Licenses cannot be used for Azure Virtual Desktop.
To connect Eplan Electric P8 to your SQL Databases open Eplan Electric P8 and navigate to the following menu items, depending on which database you want to connect:
Parts File > Settings > User > Management > Parts
Translation File > Settings > User > Translation > Dictionary
Project management File > Settings > User > Management > Project management database
- Select “SQL server” and click the […] button.
- Enter the SQL server settings as shown below.
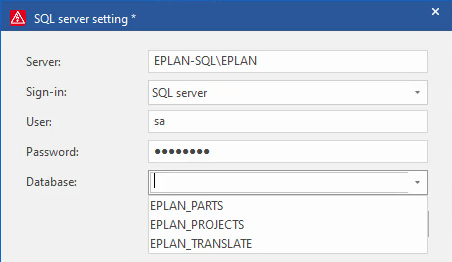
- “EPLAN-SQL” is the server name. “EPLAN” is the default instance name.
- Select the corresponding database.
Note: The default creditentials:
- User: sa
- Password: Eplan123
Ready - follow the next step!
Installation and support policy for virtual environments
- Authorization for virtual installation
- Recommendations for virtual environments
- Support - Technical problems
The ability to use your software in a virtual environment depends on the specific product, the type of licensing, and whether the terms of use permit such virtualization. Therefore, please check the applicable TOS as well as the system requirements of the software to ensure that it can run in a virtual environment.
It is possible to install and run Eplan software in virtualized environments, but thorough functional and performance testing must be performed. Eplan has tested software in virtualized or server-based environments on a dedicated scale. Only testing can ensure that this solution meets your requirements.
Microsoft Azure: If you decide to install and operate in Microsoft Azure, you will benefit from an installation package that we have tested as executable and preconfigured. We make this available to you in the Microsoft Azure Marketplace to facilitate the installation of an Eplan environment, within your company's own Microsoft Azure subscription. The Azure Marketplace components are designed for a small work environment for up to 10 users.
Other cloud providers: If you would like to host the software in a virtual environment with another cloud provider, we do not currently offer an installation recommendation. In this case, after a preliminary discussion for your individual situation, we will be happy to offer you the opportunity to analyze and evaluate the feasibility together with our experts in the form of a consulting project.
System integrations of third-party software: If you intend to integrate third-party software such as ERP, PDM/ PLM systems into your virtual environment, please contact our Professional Services experts, who will review the concrete implementation for your individual situation and discuss and evaluate it with you.
Eplan offers customers with valid subscription and software service contracts technical support in the sense of the defined scope of services to ensure that your software functions properly. The scope of services for support, please refer to the respective service description.
We support you with questions regarding the Eplan applications and products you are running in your virtual environment. Please refer to our terms and conditions for the warranty.
The operation and maintenance of the virtual environment e.g. Microsoft Azure and the related infrastructure is the responsibility of the customer, therefore support requests must be made to the respective provider of the virtual environment.
It may be necessary to cooperate with the virtual environment provider to analyze an undesired behavior in the Eplan application, this must be coordinated by the customer.
In exceptional cases, if the cause cannot be clearly identified in cooperation with the virtual environment provider, it is necessary to reproduce the undesired behavior in a physical environment.
By creating EPLAN Electric P8 with Azure virtual desktop via the Azure Marketplace, virtual machines will be created in your Azure subscription, which have the EPLAN Electric P8 preinstalled. This installation includes all available Addons and languages.
